
No products in the cart.
Halloween Gifts
Step-by-Step spooky drawings to Decorate Your Walls
03
Sep
Sep
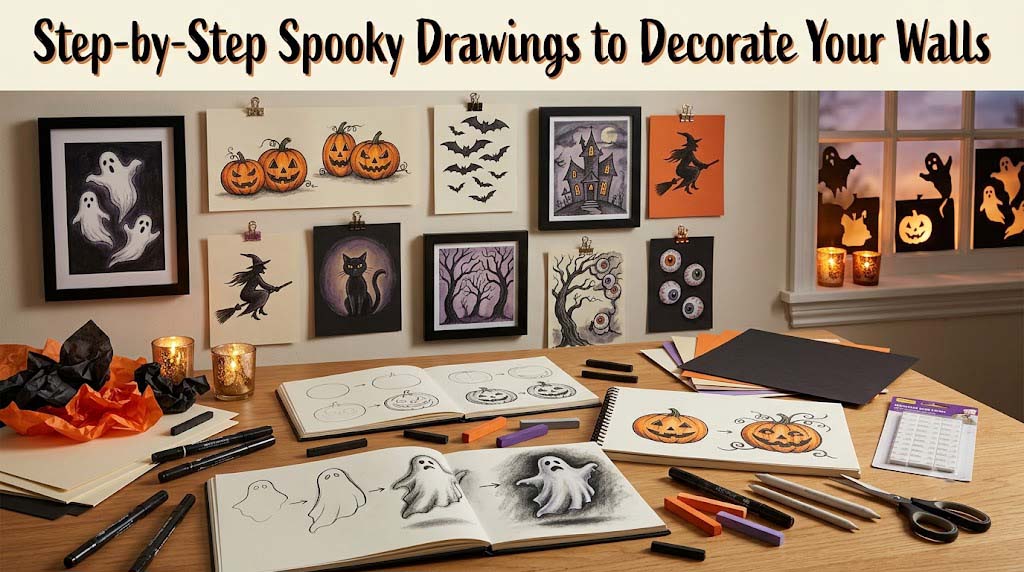
We’ve spent a few Halloween seasons figuring out which drawings actually hold up once they’re taped, framed, or propped against a wall instead of sitting flat on a sketchpad. Spooky drawings read differently up close than they do from across a room, and the shapes that look delightfully eerie at a distance aren’t always the ones with the most detail. This guide walks through choosing supplies, drawing a handful of classic Halloween characters step by step, and turning those pages into real halloween art for your walls, windows, or a party backdrop, without promising results a simple drawing exercise can’t deliver.
Getting the Right Supplies for Spooky Wall Art
Charcoal and pastels for eerie, smoky effects
Charcoal and soft pastels blend easily, which is exactly what makes them useful for Halloween drawings. A quick smudge with a finger or blending stump can turn a flat gray sky into something that looks like fog or drifting smoke behind a ghost or a haunted house.
They’re messier than pencil, so we’d keep them for the pieces meant to hang under glass or in a frame rather than anything handled often, like a kids’ activity sheet.
Black markers and fine-liners for crisp silhouettes
For anything meant to be seen from across a room, a bold black marker or fine-liner does more work than fine pencil shading ever will. A Sharpie Fine Point or a set of Micron pens are common, easy-to-find options that hold a clean line without bleeding through most paper. Thick, confident outlines are what make a bat or a witch’s hat read clearly at a distance.
We’d reach for a marker any time the drawing is destined to be cut out, since a clean dark outline is much easier to trim along than a soft pencil line.
Paper that matches the wall, window, or frame
If a piece is going under glass in a frame, the glass presses the paper flat, so even thin printer paper won’t curl there. Cardstock matters more for anything displayed without a frame, like a shape taped directly to the wall or cut out for a gallery cluster, since it holds its edge better when handled and doesn’t go see-through the way thinner paper can.
If a design is headed for a window rather than a wall, keep a sheet of tissue paper or vellum on hand too, since that comes up again later when we get to backlighting.
Picking Your First Drawing by Skill Level
Beginner picks: ghosts, pumpkins, bats
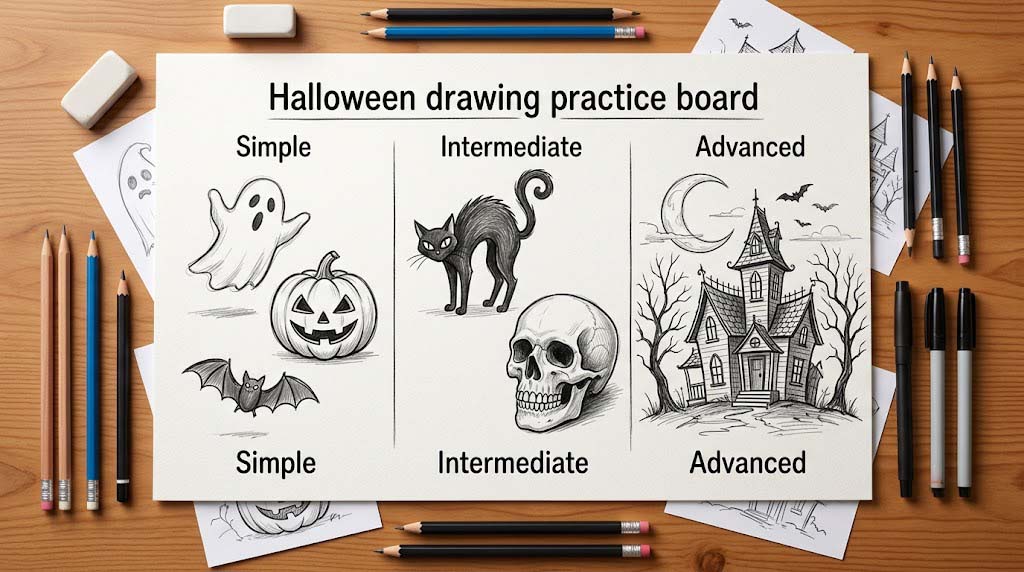
Ghosts, jack-o’-lanterns, and bats share one thing in common: their outlines are simple enough to nail on the first or second try, even without much drawing experience. That makes them a good place to start if you’re setting up a wall display and want quick wins before tackling anything more detailed.
These are also the pieces worth knocking out early if you’re already counting down how many days until Halloween and want the display finished before the last-minute rush.
Intermediate picks: black cats and skulls
Black cats and skulls ask a bit more of you, mainly around proportion. A cat’s arched back or a skull’s eye sockets are easy to get slightly wrong, so it’s worth doing a light pencil sketch first before committing to ink or marker.
Neither requires anatomical accuracy, though. A simplified, slightly stylized version usually looks better on a wall than a strictly realistic one.
Advanced pick: a full haunted house scene
A haunted house drawing pulls together perspective, multiple objects, and a sense of atmosphere, which makes it the most involved project in this guide. It’s worth saving for once you’re comfortable with the simpler shapes above.
If freehand perspective isn’t your strength yet, tracing a reference photo’s rough outline is a reasonable shortcut, as long as you’re using it as a personal guide rather than reproducing someone else’s finished artwork.
How to Draw a Classic Floating Ghost
Blocking in the basic silhouette
Start with a rounded shape for the head and let the “body” trail off into a loose, wavy hem, the way draped fabric would fall. Keep this first pass light in pencil, since you’ll likely adjust the curves once or twice.
Resist the urge to add facial features yet. A clean, recognizable silhouette is what makes a ghost drawing work from across a room, and details are easier to place once the outline feels right.
A smudging technique for a hazy glow
Once the outline is set, go back with a soft pencil or a bit of charcoal along the edges and blend it outward with a finger or blending stump. That light haze around the border is what gives the ghost its floating, slightly translucent look.
Keep the smudging subtle. Too much and the shape loses its crisp edge; too little and it just looks like a plain outline with a smear on one side.
Turning the ghost into wall-ready art
Once you’re happy with the sketch, trace over the final outline with a black marker so it holds up when cut out or scanned. From there, you can leave it as a single framed piece or cut several at different sizes and cluster them together.
A small group of ghosts at varying heights tends to look more intentional on a wall than one large drawing on its own.
Jack-o’-Lanterns and Creepy Eyeball Clusters
Carving the pumpkin’s grooves in pencil first
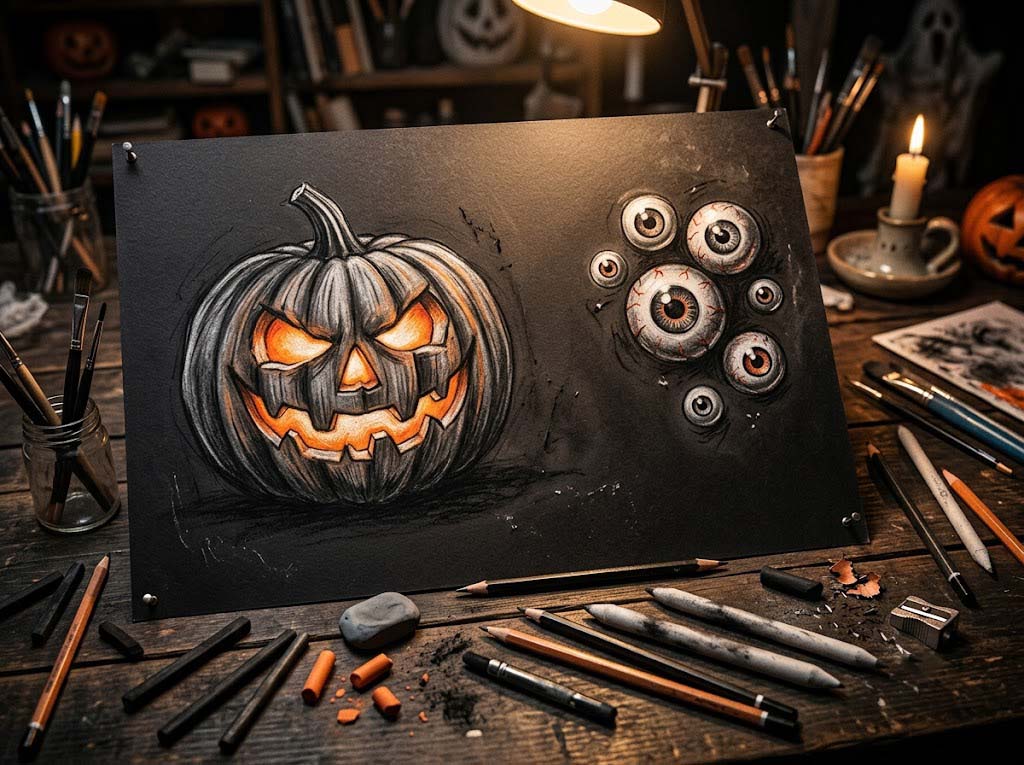
Sketch the pumpkin’s round body first, then lightly pencil in the vertical grooves before adding the face. Getting the grooves down early helps the face sit correctly within the pumpkin’s curve instead of looking flat and pasted on.
Keep the face’s features irregular rather than perfectly symmetrical. A slightly crooked grin or an uneven eye is usually what reads as playful-scary instead of just decorative.
Shading for a glow-from-within look
To suggest light coming from inside the pumpkin, shade the area just around the eyes, nose, and mouth slightly lighter than the rest of the face, then darken the surrounding shell. That contrast is what tricks the eye into reading it as glowing rather than flat orange.
That same simplified, high-contrast pumpkin face translates well beyond paper, too — it’s roughly the style you’ll see on funny Halloween shirts, so it’s a useful sketch to keep around if you ever want a design for fabric as well as the wall.
Building a creepy eye cluster with negative space
For a cluster of disembodied eyes, vary the size, spacing, and direction each one is “looking.” A handful of eyes all pointed slightly off-center tends to feel more unsettling than a neat, evenly spaced row.
Leave generous blank space around the cluster rather than filling the whole page. That empty space does a lot of the work in making the eyes feel like they’re watching from the dark.
A Flock of Flying Bats for Mass Wall Decor
One template, many bats
Draw a single bat silhouette, ideally as a solid black shape with simple pointed wings, and treat it as a reusable template rather than a one-off drawing. This is one of the few Halloween drawings where repetition is the whole point.
Once the outline feels right, trace it onto a few more sheets rather than redrawing it from scratch each time. Consistency matters more here than variety.
Arranging a flight path across the wall
Rather than lining bats up in a straight row, stagger them along a loose diagonal or curved path, as if they’re mid-flight across the wall. A gentle arc reads far more naturally than a grid.
Leave uneven gaps between them too. Perfectly even spacing tends to flatten the sense of movement you’re going for.
Mixing sizes for a sense of depth
Scale a few bats down to roughly half size and place them near the edges of the flock, as though they’re farther away. That size contrast adds a rough sense of depth without any real perspective drawing involved.
Keep the largest bats closest to eye level, since that’s where most people’s attention naturally lands first.
Drawing a Haunted House With Strong Silhouettes
Building the roofline from basic shapes
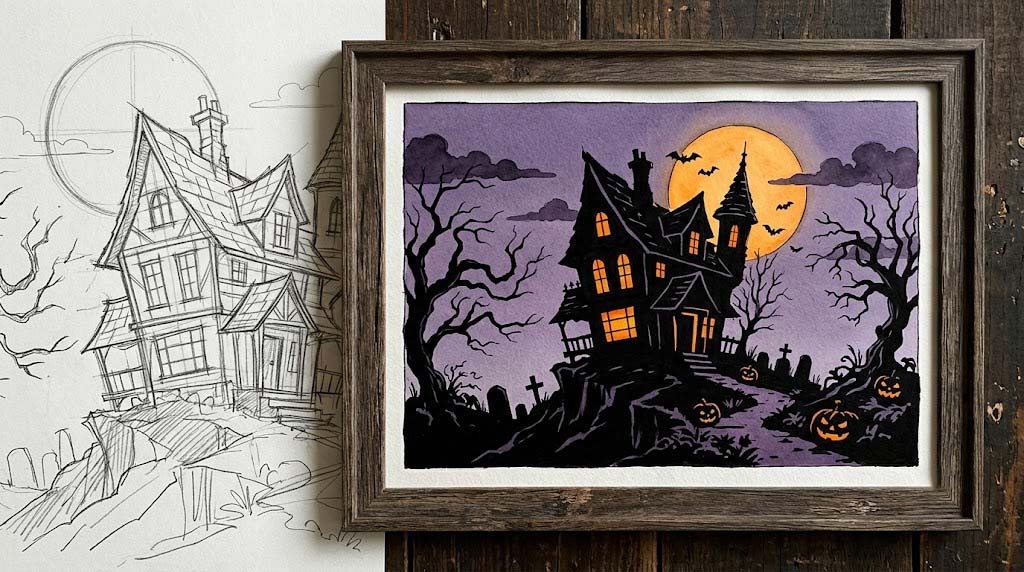
A haunted house doesn’t need architectural precision. A few offset rectangles for the main structure, topped with a couple of asymmetrical triangles for gables, is usually enough to read as “old and slightly wrong.”
Let the roofline sit a little crooked on purpose. A too-tidy house tends to look more like a real estate listing than a haunted one.
Windows, bare trees, and a moon for atmosphere
A couple of lit windows, drawn as simple bright rectangles against the dark house shape, go a long way toward suggesting something’s inside. Add a bare, twisted tree or two nearby and a plain circular moon behind the roofline to round out the scene.
Keep these background elements smaller and less detailed than the house itself, so they support the main shape instead of competing with it.
Limiting the palette to black and orange
Sticking to mostly black with orange used only for the windows and moon keeps the piece readable from across a room. Halloween drawings tend to lose impact the moment too many colors compete for attention.
If you want a third color, a muted purple for the sky works well as an accent, as long as it stays secondary to the black-and-orange contrast.
Witches, Black Cats, and Twisted Trees
A witch silhouette on a broom
Focus on the hat, the flowing cloak, and the broom’s angle rather than facial features or hands, which are the hardest parts to get right at this scale. A witch drawn purely as a silhouette against a moon is often more effective than one with a fully rendered face.
Angling the broom slightly downward, as if she’s swooping past, adds motion without any extra linework.
An arched-back black cat
An arched spine, raised tail, and a couple of triangular ears are really all a black cat drawing needs. Keep the body a single solid black shape and let the curve of the spine do the storytelling.
Two small white or yellow dots for the eyes are usually enough contrast to make the cat pop against a dark background without adding any other detail.
Gnarled trees to fill empty wall space
A bare, twisted tree with a few jagged branches is a useful filler piece for gaps between larger drawings on a gallery wall. Keep the branches asymmetrical and slightly clawlike rather than evenly spaced, and don’t worry about symmetry — a lopsided tree reads as more unsettling than a balanced one.
Scaling and Displaying Your Drawings on the Wall
Enlarging a small sketch with the grid method
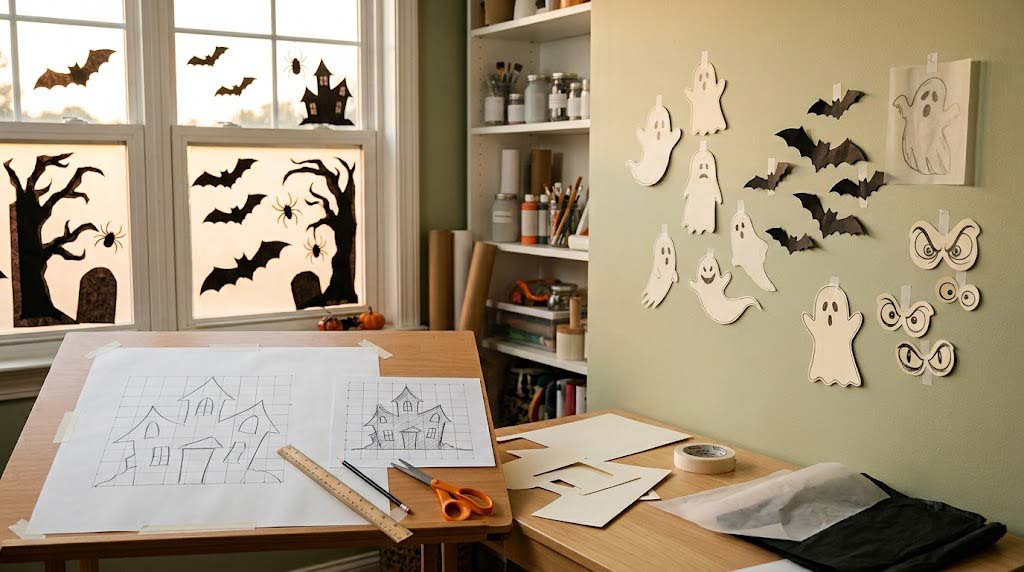
Make a photocopy of your original drawing first, or lay a sheet of clear plastic ruled into a grid over it — never draw the grid directly on the original, since that ruins the piece you’re trying to enlarge. Then draw a matching grid, scaled up, on your poster paper and copy what’s in each small square into its larger counterpart, one square at a time.
It’s a slower process than tracing or projecting, but it doesn’t require any equipment beyond a ruler, and it tends to produce a more hand-drawn, less mechanical result.
Window silhouettes with tissue-paper backlighting
For window displays, draw or trace your silhouette onto black paper, cut it out, and back it with a sheet of translucent tissue paper or vellum before taping it to the glass. Daylight or a lamp behind the window will filter through the lighter paper while the black silhouette stays sharp.
This works especially well for ghosts, bats, and eye clusters, since their strong, simple outlines read clearly even in low light.
Hanging everything without damaging paint
Reusable adhesive putty like Blu Tack, or Command Poster Strips, are generally gentler on painted walls than standard tape, particularly in a rental. It’s worth testing any adhesive on a small, hidden area of wall first, since paint types and finishes vary.
When arranging several pieces together, lay them out on the floor first to settle on spacing and height before committing to anything on the wall itself, and keep the layout clear of light switches, outlets, and doorways.
Frequently Asked Questions
What is the easiest spooky drawing for a beginner?
Ghosts, bats, and jack-o’-lanterns are generally the most approachable, since each one comes down to a single simple silhouette before any detail is added.
What can I draw for Halloween wall decorations?
Ghosts, haunted houses, witches, black cats, bats, skulls, jack-o’-lanterns, and eyeball clusters all work well, and mixing a few of them at different sizes tends to look more intentional than repeating just one.
How do I make a Halloween drawing look scarier?
Strong silhouettes, high contrast, uneven or off-center eyes, and generous negative space tend to do more than adding extra detail. A simple shape with the right shadows often reads as spookier than a busier, more literal drawing.
How do you remove charcoal or pastel smudges from a painted wall?
A dry cleaning sponge (sometimes sold as a soot sponge) lifts most charcoal and pastel dust without water, which matters since wiping it wet tends to smear the pigment further into the paint. It’s worth testing on a hidden patch of wall first, especially on flat or matte finishes, which mark more easily than satin or semi-gloss.
Will tissue-paper window silhouettes hold up if the glass gets condensation?
Tissue paper and vellum can wrinkle or lose their adhesive grip if moisture builds up on the inside of the glass overnight, which is common on cold Halloween nights. Checking the window in the morning and re-taping any loose edges is usually enough, but a spot prone to heavy condensation isn’t the best choice for a paper piece meant to last the whole season.
How do you store paper drawings to reuse them next Halloween?
Flat storage works better than rolling for anything with a marker outline or charcoal shading, since rolling can crack the surface over time. A large flat portfolio folder or even sandwiched between two sheets of cardboard in a drawer keeps pieces safe until next season.